Office
 

Microsoft Word 2010 : Creating a Table of Contents (part 2) - Adding a TOC to a Document - Inserting a Customized Table of Contents

10/15/2014 3:34:16 AM
Inserting a Customized Table of Contents

The list of automatic TOCs you saw back in Figure 3 doesn’t show all your options. It just shows the easiest ones. If you want to control your TOC’s appearance and what it includes, you can use the Table of Contents dialog box. Here’s how:

1.
Make sure the insertion point is on a new, blank page at the beginning of the document.

2.
On the References tab, click Table of Contents.
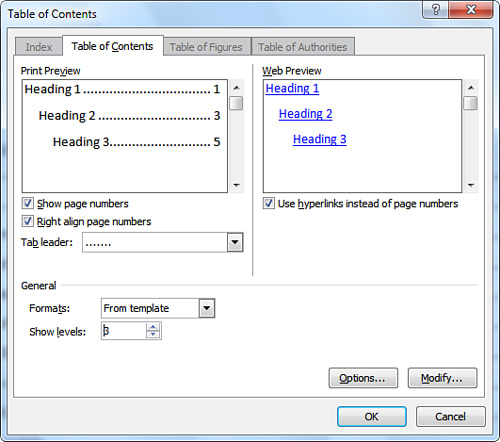
3.
Click Insert Table of Contents. The Table of Contents dialog box opens, as shown in Figure 3.

Figure 3. Customizing a TOC in the Table of Contents dialog box.

4.
To select a different overall format for the TOC, click the Formats drop-down arrow; then click a formatting option. You can preview the selected format in the Print Preview box.

5.
Use the Show Levels spin control to specify the number of heading levels to include in the table. The default is three levels, but a TOC can display as many as nine levels.

6.
By default, Word shows page numbers in a TOC. (Otherwise, what would be the point?) To omit page numbers, clear the Show Page Numbers check box.

7.
Word right-aligns page numbers on the TOC’s pages. You can change this by clearing the Right Align Page Numbers check box, but then Word simply places each page number immediately after its heading, which looks funny.

8.
To select a different type of leader (the line of dots separating the headings from the page numbers), click the Tab Leader drop-down arrow and select an option.

9.
When you finish customizing your TOC, click OK. Word inserts the TOC according to your specifications.

Updating a TOC

If you make any kind of change to a document’s headings, you should update the table of contents to reflect those changes. To update the TOC, click it to select it. On the References tab, click Update Table. Word displays a message box that asks whether you want to update the TOC’s page numbers or the entire table. Click the appropriate option; then click OK.

Deleting a TOC

To remove a table of contents from a document, click the table, and then click the Table of Contents button on the References tab. On the Table of Contents menu, click Remove Table of Contents.

 
Others
 
- Microsoft Word 2010 : Creating a Table of Contents (part 1) - Adding a TOC to a Document - Inserting an Automatic Table of Contents
- Microsoft Word 2010 : Creating an Outline (part 3) - Building an Outline - Expanding and Collapsing Parts of an Outline , Reorganizing an Outline
- Microsoft Word 2010 : Creating an Outline (part 2) - Building an Outline - Adding Headings to an Outline, Promoting and Demoting Headings
- Microsoft Word 2010 : Creating an Outline (part 1) - Working in Outline View
- Microsoft Excel 2010 : Working with Graphics - Inserting a Diagram,Inserting an Object
- Microsoft Excel 2010 : Working with Graphics - Inserting WordArt, Using Smart Art in Excel
- Microsoft Excel 2010 : Working with Graphics - Using AutoShapes
- Microsoft PowerPoint 2010 : Preparing a Slide Show - Working with Fonts
- Microsoft PowerPoint 2010 : Preparing a Slide Show - Creating a Self-Running Presentation
- Microsoft PowerPoint 2010 : Preparing a Slide Show - Hiding Slides
 
 
Popular tags
 
Microsoft Access Microsoft Excel Microsoft OneNote Microsoft PowerPoint Microsoft Project Microsoft Visio Microsoft Word Active Directory Biztalk Exchange Server Microsoft LynC Server Microsoft Dynamic Sharepoint Sql Server Windows Server 2008 Windows Server 2012 Windows 7 Windows 8 Adobe Indesign Adobe Flash Professional Dreamweaver Adobe Illustrator Adobe After Effects Adobe Photoshop Adobe Fireworks Adobe Flash Catalyst Corel Painter X CorelDRAW X5 CorelDraw 10 QuarkXPress 8 windows Phone 7 windows Phone 8 BlackBerry Android Ipad Iphone iOS
 
 
Top 10
 
- Windows Vista : How to fix - There’s No Room on My Screen
- Windows Vista : My Colors Are Ugly and Chunky - How to Fix Color Depth
- Windows Vista : How to Fix Your Pixels - Dealing with Display Issues
- Joyless Joysticks: How to Fix Your Controller
- How to Fix Left Truncation, Conceptually
- Microsoft Visio 2013 : Creating Flowcharts and Organization Charts - Building organization charts by hand
- Microsoft Word 2010 : Creating Mail Merge Documents - Merging to E-mail - Mail Merge to E-mail
- Microsoft Word 2010 : Creating Mail Merge Documents - Completing the Mail Merge - Personalize and Print the Mail Merge
- Microsoft Word 2010 : Creating Mail Merge Documents - Previewing the Mail Merge
- Microsoft OneNote 2010 : Restoring Notes from a Backup (part 2) - Restoring an Entire Section from a Backup, Restoring Selected Pages from a Backup