3. Understanding control handles and control handle lines
If an anchor point has a control handle coming out
of it, the next segment is curved. No control handle, no curve.
Couldn't be simpler.
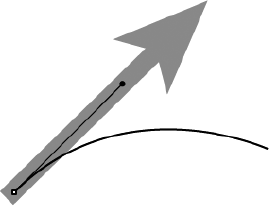
As stated before, control handles are connected to anchor points with control handle lines. Figure 3
shows what happens when an anchor point with no control handle and an
anchor point with a control handle are connected to another anchor
point. Figure 4 shows the anchor points, control handles, and control handle lines on a path.


The basic concept to remember about control handles
is that they act as magnets by pulling the curve toward them. This
presents an interesting problem because each curved line segment
usually has two control handles. Just as you might suspect, the control
handle exerts the greatest amount of force on the half of the curved
segment nearest to it. If there's only one control handle, the segment
curves more on the side of the segment with the control handle than on
the side with no control handle.
The greater the distance between a control handle
and its corresponding anchor point, the farther the curve (on that end
of the curve segment) pulls away from an imaginary straight segment
between the two points. If the control handles on either end of the
segment are on different sides of the curved segment, the curved
segment takes on a reversed S shape, as shown in Figure 5. If the control handles on the ends of the curved segment are on the same side, the curve takes on a U shape.
Regardless of whether the anchor point is a smooth
point, a curved corner point, or a combination corner point, control
handle lines coming out of an anchor point are always tangent to the
curved segment where it touches the anchor point. Tangent refers to the
touching of the control handle line to the curved segment as it crosses
the anchor point, as shown in Figure 6.
|
To adjust the curves without moving the control
handles, click the curve and then drag it. Keep in mind that you're
changing both control handles at once, which can make adjusting the
curve hard to control.
|
|

|
If you don't know much about geometry (or maybe
don't remember much — it was back in high school, after all), you may
find the very concept of creating curves by using math frightening. But
most of the curve creation in Illustrator takes place behind the scenes
when you use a drawing tool, such as the Pen tool.
PostScript curves are based on Bézier curves
(pronounced bez-ee-ay), which were created by Pierre Bézier as a way of
controlling mechanical cutting devices, commonly known as Numerical
Control. Bézier worked for Renault (the car manufacturer) in France,
and his mission was to streamline the process by which machines were
controlled.
A mathematician and engineer, Bézier developed a
method for creating curves using four points for every curved segment.
He placed two points at either end of the segment — in Illustrator,
these correspond to the anchor points — and made two points float
around the curve segment to control the curve's shape; these are
control handles in Illustrator. Using these four points, you can create
any curve; using multiple sets of these curves, you can create any
possible shape. John Warnock and Chuck Geschke of Adobe decided that
Bézier curves were the best method for creating curves in a page
description language (PostScript), and suddenly those curves became a
fundamental part of high-end graphic design.
Bézier curves are anything but intuitive, and in
fact, they represent the most significant stumbling block for beginners
learning Illustrator. After you master the concept and use of these
curves, everything about Illustrator suddenly becomes easier and
friendlier. Don't try to ignore them because they won't go away. You'll
find it easier in the long run to try to understand how they work.
|