WHETHER YOU ARE WRITING
the great American novel, a standard business letter, or a résumé,
spelling or grammatical errors can ruin the impression you’re trying to
create. Not only does Word have spelling and grammar checkers to
correct document errors, it also has a thesaurus to help you find just
the right word to convey your ideas.
Word has built-in dictionaries and grammatical rule
sets that it uses to check your document. Word can identify possible
problems as you type, and it also can run a special spelling and
grammar check that provides you with more information about the
problems and tools for fixing them. And although they have been greatly
improved in Word 2010, these features aren’t infallible; if you type
“To air is human” instead of “To err
is human,” Word probably won’t be able to tell you that you’re wrong.
However, combined with a good proofreading, these tools are very
helpful.
Checking Spelling and Grammar as You Go
As you type your document, Word operates the spell
checker tool in the background and identifies problems. Word tags
potential spelling errors with a red wavy line under them. Right-click
on an unrecognized word, and you see a shortcut menu appear with
possible suggestions for correction (see the example in Figure 1).
Click on the correct spelling, and the misspelled or unrecognized word
is replaced with your selection. Occasionally, Word cannot provide a
suggestion. In those cases, you need to correct the error yourself.
|
If Word interprets a word as a misspelling, but it
is a word you use frequently, such as a name or business term, you can
add it to your Dictionary so Word won’t see it as a misspelling.
|

As
with spelling errors, Word identifies potential grammatical errors by
placing a green wavy line under the questionable text. Right-click on
the questionable word or phrase to display a shortcut menu with
suggested grammatical corrections. Click the appropriate option, and
Word replaces the incorrect word or phrase with your selection.
Sometimes, however, Word cannot provide a suggestion; in those cases,
you need to correct the error yourself.
|
Do not rely on
Word’s spell check and grammar features to catch all your errors. The
tools are very helpful, but they are far from perfect and can miss many
items. They can also flag items as errors that really are okay and can
suggest wrong ways to fix both real problems and false errors. You
alone are the one who knows what you want your document to say.
Proofread it yourself!
|
Running a Spelling and Grammar Check
If you don’t want to correct items as you type, Word
can run a Spelling and Grammar check at the same time. Running the
Spelling and Grammar check also provides additional options for dealing
with incorrect items. Use the following steps:
Position
the insertion point at the beginning of the document to check the
entire document. If you only want to check a portion of the text,
select the text first.
Choose
Review > Proofing > Spelling and Grammar. If there are no errors
in the document, a message box appears advising you that the checks are
complete; otherwise, Word displays the Spelling and Grammar dialog box
shown in Figure 2, referencing the first error, whether spelling or grammar.

Tip
Optionally, press F7 to launch the Spelling and Grammar check.
If the error is a spelling error, do one of the following:
Ignore Once: Click this if you don’t want to correct this instance of the spelling.
Ignore All: Click this if you don’t want to correct any instances of the spelling.
Add to Dictionary: Choose this to add the word to the Dictionary so that in the future Word won’t flag it as an error.
Change: Choose a word from the Suggestions list and then click Change, which changes just this incident of the spelling mistake.
Change All:
After selecting a replacement from the Suggestions list, choose Change
All if you think you could have made the same mistake more than once.
AutoCorrect:
After making a selection from the Suggestions list, click this option
to add the unknown word and the correction as an AutoCorrect entry. If
you make the same misspelling in a future document, Word automatically
changes it to the correction.
If the error is a grammatical error, such as you see in Figure 3, take one of these actions:
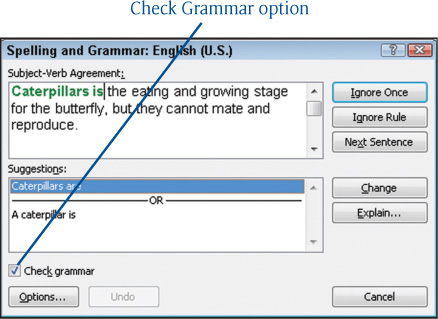
Tip
If you don’t want Word to check grammar, remove the checkmark from the Check Grammar option.
Ignore Once: Click this option if you don’t want to change this instance of the grammatical problem.
Ignore Rule: Click this option to ignore all instances of the same grammatical problem type.
Next Sentence: Click this option to skip the error and continue the check. All instances of the same error are ignored.
Change: Choose an option from the Suggestions list and then click Change, which changes just this incident of the grammatical mistake.
Explain: Click this option to launch an article that explains the error and offers suggestions for avoiding the error.
When
all potential mistakes are identified, Word notifies you that the
Spelling and Grammar check is complete. Click the OK button.
Changing Spelling Options
Word provides quite a few options for both the
spelling and grammar correction features. For example, if you don’t
want Word to check your spelling or your grammar as you type, you can
turn off the feature. Click the File tab and choose Options. Click the
Proofing category.
From the Proofing section, as shown in Figure 4,
you can set or turn off any desired proofing options. Some of the
options apply to all Office 2010 applications, and some apply only to
Microsoft Word. There are even a few options that apply only to the
current document.

|
From
the Word Options dialog box, click the Show Readability Statistics
check box. After running a Spelling and Grammar check, Word displays
statistics, such as the number of words, characters, paragraphs, and
sentences, as well as average words per sentence or the readability
grade level. See Figure 5 for an example.
|
